Last updated: 12 June 2026
Construction timelapse on iPhone — phone-based workflow
A dedicated construction timelapse camera — Brinno, EvoCam, Enlaps Tikee — runs from £400 to £1,500. Add solar power, weatherproof housing and a mount you can leave on scaffold for nine months and the bill rises further.
That setup makes sense for a builder running a hundred-flat development. For a self-build, a renovation, a small extension or a homeowner watching their own project, that kit is usually overkill.
For projects at that scale, an iPhone in your pocket and a weekly site visit is enough. The whole technique is one trick: make sure this week's photo is framed the same as last week's. That's the problem this guide solves. See the blog index for related guides.
What kind of project this works for
- Home renovation or extension over weeks to months.
- Self-build or kit house — slab to handover.
- Garden, deck, patio, summer house.
- Loft conversion or basement dig.
- Single-flat or single-house refurbishment, especially for landlords needing a record.
- Small contractor showing weekly progress to a client.
It doesn't replace a fixed-mount camera for high-frequency shots. Second-by-second motion — clouds racing past a half-built tower, for example — is not what you'll capture with weekly phone shots.
What you do get is the headline result: 30 weekly photos that play back as a clean before-to-after for social, portfolios or client handovers.
Choose your viewpoints first
Walk around the site before any work starts and pick three to five viewpoints. Mark each one on a sketch or in your phone's notes.
- The hero shot. The angle that shows the most. Usually a corner view where you see two faces of the building.
- The detail shot. A close-in angle on the interesting part — the extension footprint, the new dormer, the rear elevation.
- The interior shot. One key room being transformed. Same corner each visit.
- The optional drone shot. Top-down or 30°-overhead. If you have a drone, it's useful. If not, skip it.
Three is the realistic minimum. Five is the cap before you start skipping visits because there's too much to do.

Marking and recording each viewpoint
Practical marks and notes save a lot of guesswork. Mark the standing spot with a removable spray chalk mark or a numbered cable-tie on nearby fencing. Record a GPS pin in Apple Maps and add a one-line note (for example, "Hero corner, 1.2m from neighbour post").
Use a small tripod or a phone clamp if you need extra steadiness. Name photo albums YYYY-MM_Viewpoint-01 and export originals to a backup folder monthly.
The framing problem with phone-based site photos
Many contractors and homeowners do this: they visit weekly, take photos, then find the images differ slightly in angle. The result is a set of inconsistent progress photos that won't stitch into a timelapse.
The fix is to mark the viewpoints and align to a reference photo each visit. Marks alone aren't enough — boot prints, mud, parked vans or a new fence can move the actual spot you can stand. You need the previous photo to compare against, on the spot, in real time.
Overlay technique: align each week's photo
This is the technique that turns a phone-and-pocket workflow into a real timelapse: display last week's photo on top of the live camera, then move until the two match. It's a straightforward rephotography method that makes alignment reliable; see rephotography techniques for more detail.
I built Contour for exactly this. Load the reference photo from the previous visit, the app traces its outlines — roof line, window frames, temporary fencing, the corner of the building behind — and overlays them on your live camera. You move forward, back, left, right, and watch the outlines drift across the scene until they snap onto the real-world equivalents. Press the shutter.
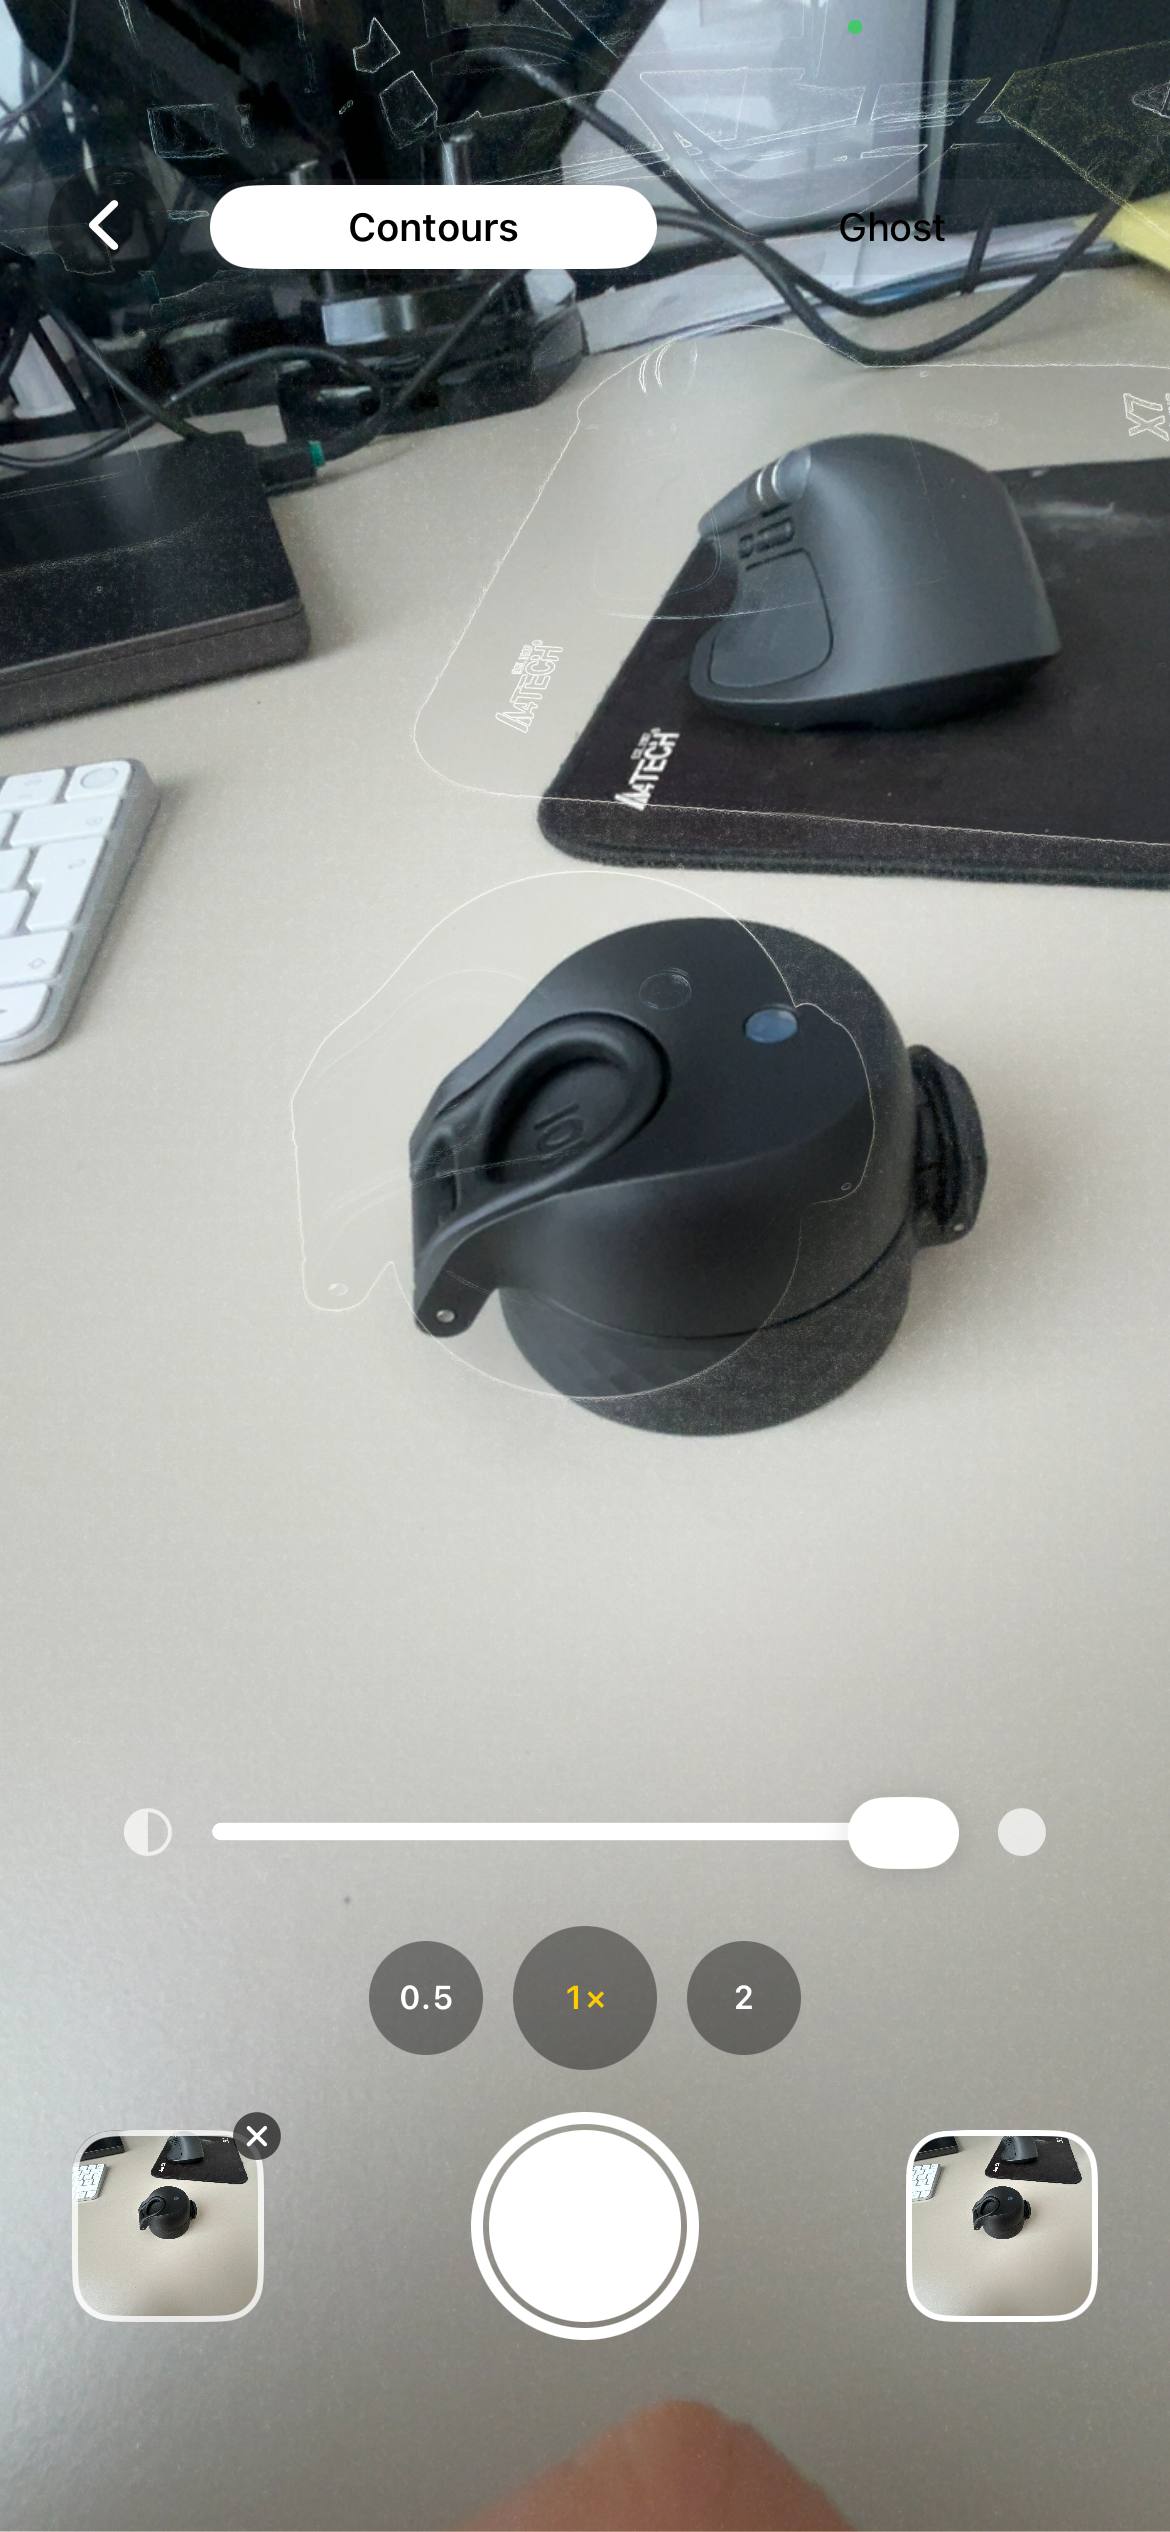
Do that for each viewpoint, three to five times a visit, once a week. Expect about twenty seconds per shot once you're used to the routine. The new shot lines up with the previous one and the whole series stitches into a clean timelapse.
On one job I learned to avoid shooting at noon — harsh roof shadows broke alignment. Switching to late-morning visits fixed it.
If you can't physically stand in the previous spot one week — a fence is up or machinery is in the way — take the closest match, write a short note, and re-baseline that viewpoint the next week. The timelapse will show a small jump, but the sequence still tells the project's story.
Weekly shots: what to photograph
- Walk to viewpoint 1, align to the previous photo, shoot.
- Repeat for viewpoints 2, 3, 4, 5.
- Take free-form shots for the diary — close-ups of new work, issues to discuss, deliveries.
The five timelapse shots are the structural record. The free-form shots are the project diary. Keep them in separate albums. See progress photos for guidance on diary images and organisation.
Settings on the phone
- Native camera, no portrait mode. Portrait mode's bokeh changes between shots and ruins comparison.
- 1x (main) lens. Use the phone's standard main lens. Avoid the 0.5x ultra-wide — its distortion changes geometry — and avoid telephoto for consistent framing.
- Same aspect ratio every time. 4:3 is the most flexible.
- HEIC or JPEG, your choice. Just stay consistent.
- HDR off if you're chasing colour consistency. HDR exposure can swing wildly with backlighting. Manual exposure tap each time if the sun position has shifted.
Light and weather
You can't control the weather on a site visit. Prefer overcast or shoot within ±1 hour of your chosen time each week. If constrained, record the time-of-day in the photo caption to aid future colour matching. Soft, even light avoids hard shadows that break alignment.
For genuinely watchable timelapses, accept that weather variation is part of it. Don't try to force nine months of mixed weather into a single graded look.
When I re-baselined a viewpoint after a scaffold was installed, I noted the reason in the album caption so the jump is explainable later.
Producing the final timelapse
Once you have 20+ aligned photos for a viewpoint, stitch them together in order. Contour can do this directly — pick the album, set the frame rate (5–8 fps usually reads well for construction), save as a GIF or share. For a polished MP4 with music and a title, import the same images into CapCut or iMovie.
For client deliverables, provide one timelapse per viewpoint (typically 20–40 seconds each) plus the photo album of source images. The album is the record; the timelapse is the highlight.
When you should buy the real camera anyway
The phone approach has limits. Buy a Brinno or equivalent if:
- The project is more than 12 months and visits aren't reliable.
- You want second-by-second motion (for example, a tower crane swinging steel — phones won't capture that).
- You're billing the timelapse as a client deliverable and need uptime guarantees.
- The site is inaccessible mid-project (think infrastructure or remote builds).
For everything else — homeowners watching their own build, small contractors, renovators — a phone and weekly visits with proper alignment is enough.
FAQ
- Can I make a construction timelapse on iPhone?
- Yes. Weekly aligned iPhone photos from 3–5 fixed viewpoints produce a clean construction timelapse suitable for renovations and self-builds.
- How do I shoot a building house time lapse with my phone?
- Pick 3 viewpoints, use the 1x lens, keep aspect ratio and exposure consistent, and align each week to the previous photo.
- Is DIY timelapse good enough for clients?
- For small contracts and homeowner updates, yes — add source albums and per-viewpoint timelapses for deliverables.
Align weekly shots with an overlay
Open Contour, load last week's photo, and trace the outlines on your live camera to align the new shot. It keeps the reference on-device and works on iPhone only.
Open on the App Store