Last updated: 12 June 2026
Rephotography: recreate the same photo years later
Rephotography — also called repeat photography or simply "then and now" shots — is the practice of standing in the same place as a previous photographer and recreating their image years, decades, or sometimes a century later.
The result is two pictures that line up exactly: fixed elements (buildings, hills, walls) stay the same while people, trees, paint and weather show what changed over time.
This guide walks through how it's actually done, the part nobody warns you about, and the tool that makes it work on a phone.
What rephotography (repeat photography) is
The classic example: a photographer in 1920 takes a photo of a city street. A century later someone stands on the exact same spot, with the camera at the same height and the same focal length, and takes the photo again. The two images can be overlaid pixel-for-pixel on the fixed elements — and the difference is purely time.
The same technique is used for:
- Then-and-now travel photos — a holiday shot from your twenties, recreated in your forties.
- Family photos — kids in the same garden, the same kitchen, the same staircase, year after year.
- Architectural change — documenting how a street, a building or a neighbourhood evolves.
- Environmental science — glaciers, coastlines, forests photographed from a fixed station to measure change.
- Recreations of famous images — same statue, same doorway, same alley as a photo you saw online.
The core challenge in all of them is the same: standing in exactly the right spot, with the camera pointing exactly the right way.
What makes a rephotograph "lock in"
For two photos to overlay cleanly, five things need to match:
- Camera position. Where in 3D space the lens is. Forward, back, left, right, up, down.
- Camera direction. What it's pointed at. Pan, tilt, roll.
- Focal length. How wide or narrow the lens. A 35mm shot and a 50mm shot of the same scene from the same spot still look different — different parts of the frame are filled.
- Aspect ratio. 3:2, 4:3, 16:9 — crop the new shot to match the old one.
- Lens distortion. Wide phones distort edges. A modern phone matching a vintage rectilinear lens needs the wider lens, not the ultra-wide.
Camera position and direction are the hard ones; focal length, aspect ratio and distortion are settings you can control.
How to find the original camera position
Without the original photographer's notes, the only way to find the camera position is to triangulate by eye. The trick is to use parallax — the way nearby objects shift against distant objects as you move sideways.
If you stand too far left, the lamp post in the foreground appears further left of the building behind it than in the original. Step right and watch the lamp post slide right against the building. When it lines up — front-to-back features sitting in the same relationship as the original — you're on the correct sideways line. Then walk forward or back along that line until the framing matches. Then adjust height.
Doing this by flicking between your phone's gallery and the live camera is painful. You glance at the old photo, look up, take a guess, take a photo, check, adjust, re-shoot.
Twenty attempts in you're still not quite there.
A mistake I learned the hard way: I once tried matching a reference while standing on soft ground — my height changed as the soil compressed and I missed the alignment by inches. Now I measure lens height with a tape or use a low tripod when accuracy matters.
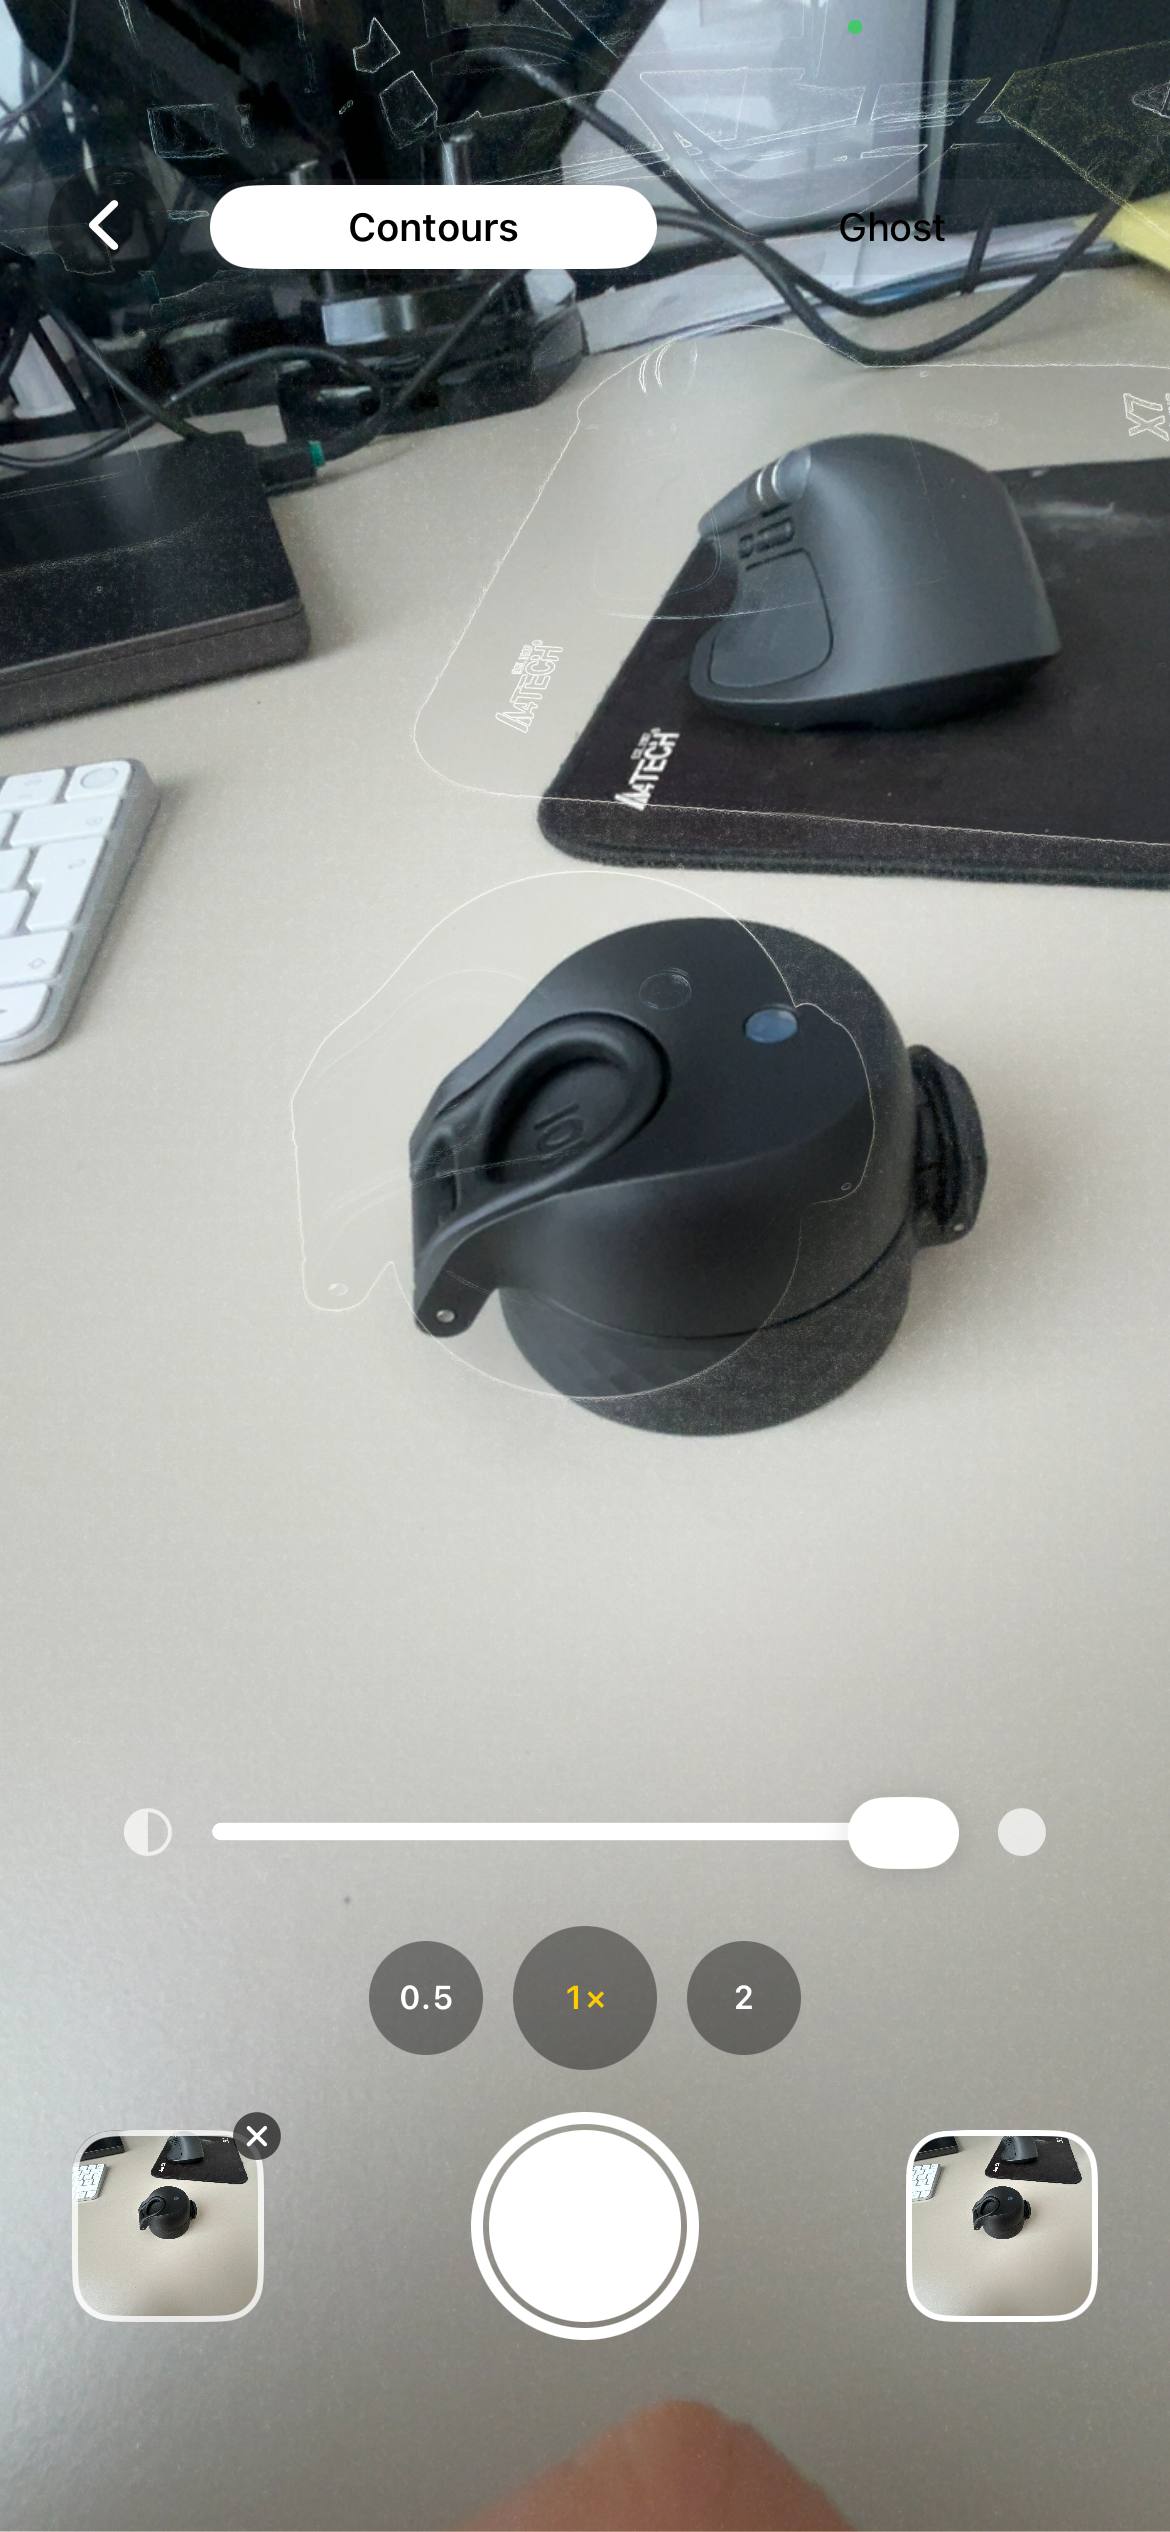
The overlay trick
The fix is to look at both at the same time. You put the old photo as a translucent layer on top of the live camera view, and you walk around until the old photo and the live scene snap together.
Trees in the right place. Roof lines aligned. Edges of buildings on top of each other.
This is what Contour is built to do. You load the original photo, the app traces its outlines and overlays them on your live camera in real time. You walk forwards, back, left, right, and watch the outlines drift over and snap onto the real-world edges. When they lock in, you press the shutter — and the new photo will overlay onto the old one pixel-for-pixel.
Practical tips that save you an hour
- Find the season first. Bare branches in the original mean late autumn or winter. Match the season before you travel — green leaves in May will hide half the architecture the original showed.
- Match the time of day. Note shadow direction and sun angle: use SunCalc or record the clock time and compass bearing, then return within ±30 minutes on a similar date.
- Use the widest "normal" lens on your phone. Avoid the ultra-wide. Its distortion never matches an older lens.
- Stand on something solid. If the original photographer was on a wall or a bench, you may need to be too. Inches matter.
- Take the shot relaxed, then take a "close enough" backup. You can fine-tune later. Don't burn an hour chasing the last pixel.
- Save with the original. Stack the two as a comparison or stitch them into a GIF. The story only lives in the pair.
- When I re-shot a family staircase, I marked the exact heel-to-heel distance from the bannister on the floor so I could return precisely years later.
- Technical workflow. Check the original EXIF for focal length and orientation if available. Shoot RAW when possible. Match aspect ratio in-camera or crop to match later. Keep a note of lens choice in the filename.
If you regularly document change, see the guide on how to take progress photos for a workflow that keeps results consistent over time: how to take progress photos.
When the original spot is gone, and other edge cases
Matching height: Measure lens-to-ground distance in the reference where possible (for example from props or visible features) or use a tripod and record the height; mark a nearby permanent object and measure heel-to-heel distance.
If the original spot no longer exists: Triangulate from remaining fixed points (doorways, lampposts) and document that your rephoto is an approximation — note the change in captions so viewers understand any shift.
Permissions: If you're on private property, ask first; when recreating people in private spaces prefer consent. Respect privacy and explain the project if you plan to publish.
Rephotography projects worth knowing about
If you're looking for inspiration, the genre has a long history. The Rephotographic Survey Project re-shot 19th-century American West photographs in the 1970s. Camilo José Vergara documented American urban change over decades. The Mannahatta Project rebuilt 1609 Manhattan from comparisons. Glacier monitoring stations re-shoot the same vista every year on the same date. The shared idea: a single image isn't a record. A pair separated by time is.
For my notes on creating an app for this workflow, see the app I started with. For related workflows that use repeated captures over long periods, see construction timelapse on iPhone for a practical approach to scheduled documentation: construction timelapse on iPhone.
FAQ
What's the difference between rephotography and repeat photography?
None — both terms mean taking a new photo from the same position as an earlier one.
They are used interchangeably. "Rephotography" tends to appear in art and academic contexts, while "repeat photography" is common in science and ecology. Both aim to compare time-separated images from the same spot.
Is there a photo alignment app for this?
Yes — Contour overlays a traced version of the original on your live camera to help align shots. It is available on iPhone and does not upload your photos.
Load the original, let the app trace its outlines, and use that translucent layer to walk until edges align. It saves dozens of trial shots and lets you lock in the exact position visually.
How do I make a then-and-now photo on a phone?
Stand in the same spot, match focal length and aspect ratio, line up framing and shoot.
Use parallax and fixed points to find the sideways line; adjust forward/back to match framing and set height to match eye level or lens height. An overlay app turns this into a simple visual match.
Do I need the original photographer's camera or settings?
No — match the image's framing and focal length rather than the original equipment.
You're matching what the original shows, not the exact kit. If you can match focal length and aspect ratio (roughly), the resulting alignment will read as the same viewpoint.
What focal length should I use?
Use the focal length closest to the original; match your phone's nearest equivalent lens.
Most phones have a "1x" lens around 24–28mm equivalent and a 2x/3x between 48–77mm. Pick the option nearest the original; avoid ultra-wide where distortion will differ.
Recreate the photo, not approximate it
Load the original, trace its edges and overlay them on your live camera to walk into the exact camera position. Contour is free on iPhone and does not upload your photos.
Download Contour