Last updated: 12 June 2026
How to take progress photos that actually show change
Most progress photos fail before you even compare them. A small change in distance, light or angle makes two photos hard to compare.
You might stand a little closer to the mirror this week, the curtains could be open, or you may be turned five degrees the wrong way. By eye it looks fine, but a month later the photos no longer show what actually changed — they show framing drift.
Why your progress photos look inconsistent
Four things drift between shots, and any one of them is enough to ruin the comparison:
- Distance. A step closer or further from the camera changes how broad your shoulders look, how narrow your waist looks, how big your arms look. Bigger changes than a month of training will give you.
- Angle. Camera height moving from chest to waist to hip flatters and un-flatters different muscle groups completely.
- Pose. Hands at sides vs hands on hips, weight on one leg vs both, stomach sucked vs neutral. Any of these change your silhouette by more than a few weeks of work ever will.
- Light. Overhead light flattens. Side light from a window sculpts. The same body in the two different lighting setups looks like two different people.
Fix all four and the photos start telling the truth.
The progress photo protocol
Set this up once. Repeat it every time.
- Pick one spot and stick to it. Same room, same wall, same time of day. Mark a spot on the floor with a dot of coloured tape or a removable sticker about 5 cm wide; photograph your foot position and save that photo so you can exactly match where your toes land. Note the tripod distance in centimetres from the wall (e.g. 120 cm).
- Same outfit, same baseline. Before shooting: (1) Wear the same garment (keep it in a labelled drawer); (2) Photograph after the toilet and before breakfast; (3) Remove accessories that change silhouette (watch, bulky trainers).
- Fix the camera height. Use a tripod, a shelf, a stack of books — anything that puts the phone at the same height every time. Belly-button level is a safe default. Mark that height too. On my setup I use a 1.2m shelf (roughly belly-button level for me) and a strip of tape on the wall to mark the tripod feet — doing this once saved me time every week.
- Neutral pose, no flexing. Arms relaxed at your sides, weight on both feet, breathe normally. Take a flexed shot afterwards if you want, but the comparison shot is always relaxed. Flexing is a skill you get better at — it hides real progress under a moving baseline.
- Three angles every time. Front, side, back. Same order, same poses. Side shots show waist and posture changes the front never will.
- Match the framing exactly. This is the part everyone gives up on. Hold up the previous photo on a second device or on the phone screen, and try to make today's frame match. Or do it the easy way — see the rephotography guide on rephotography.
The framing problem nobody solves
Five of those six rules are easy.
The framing one is the one that sinks 90% of people. You can mark the floor and the camera height and still end up with shots where the previous photo had your head two inches lower in the frame and your toes cut off in this one, and now the comparison is useless.
I learned this the hard way — the bathroom-light mistake I made on week six: I moved the phone up a shelf and thought nothing of it; two months of photos were unusable because my head sat lower in frame. That's why I built Contour to overlay the previous image while you shoot.
The fix is to see the old photo while you take the new one. Not flick back to gallery, not eyeball it — actually overlay it onto your live camera so you can stand in the right place.
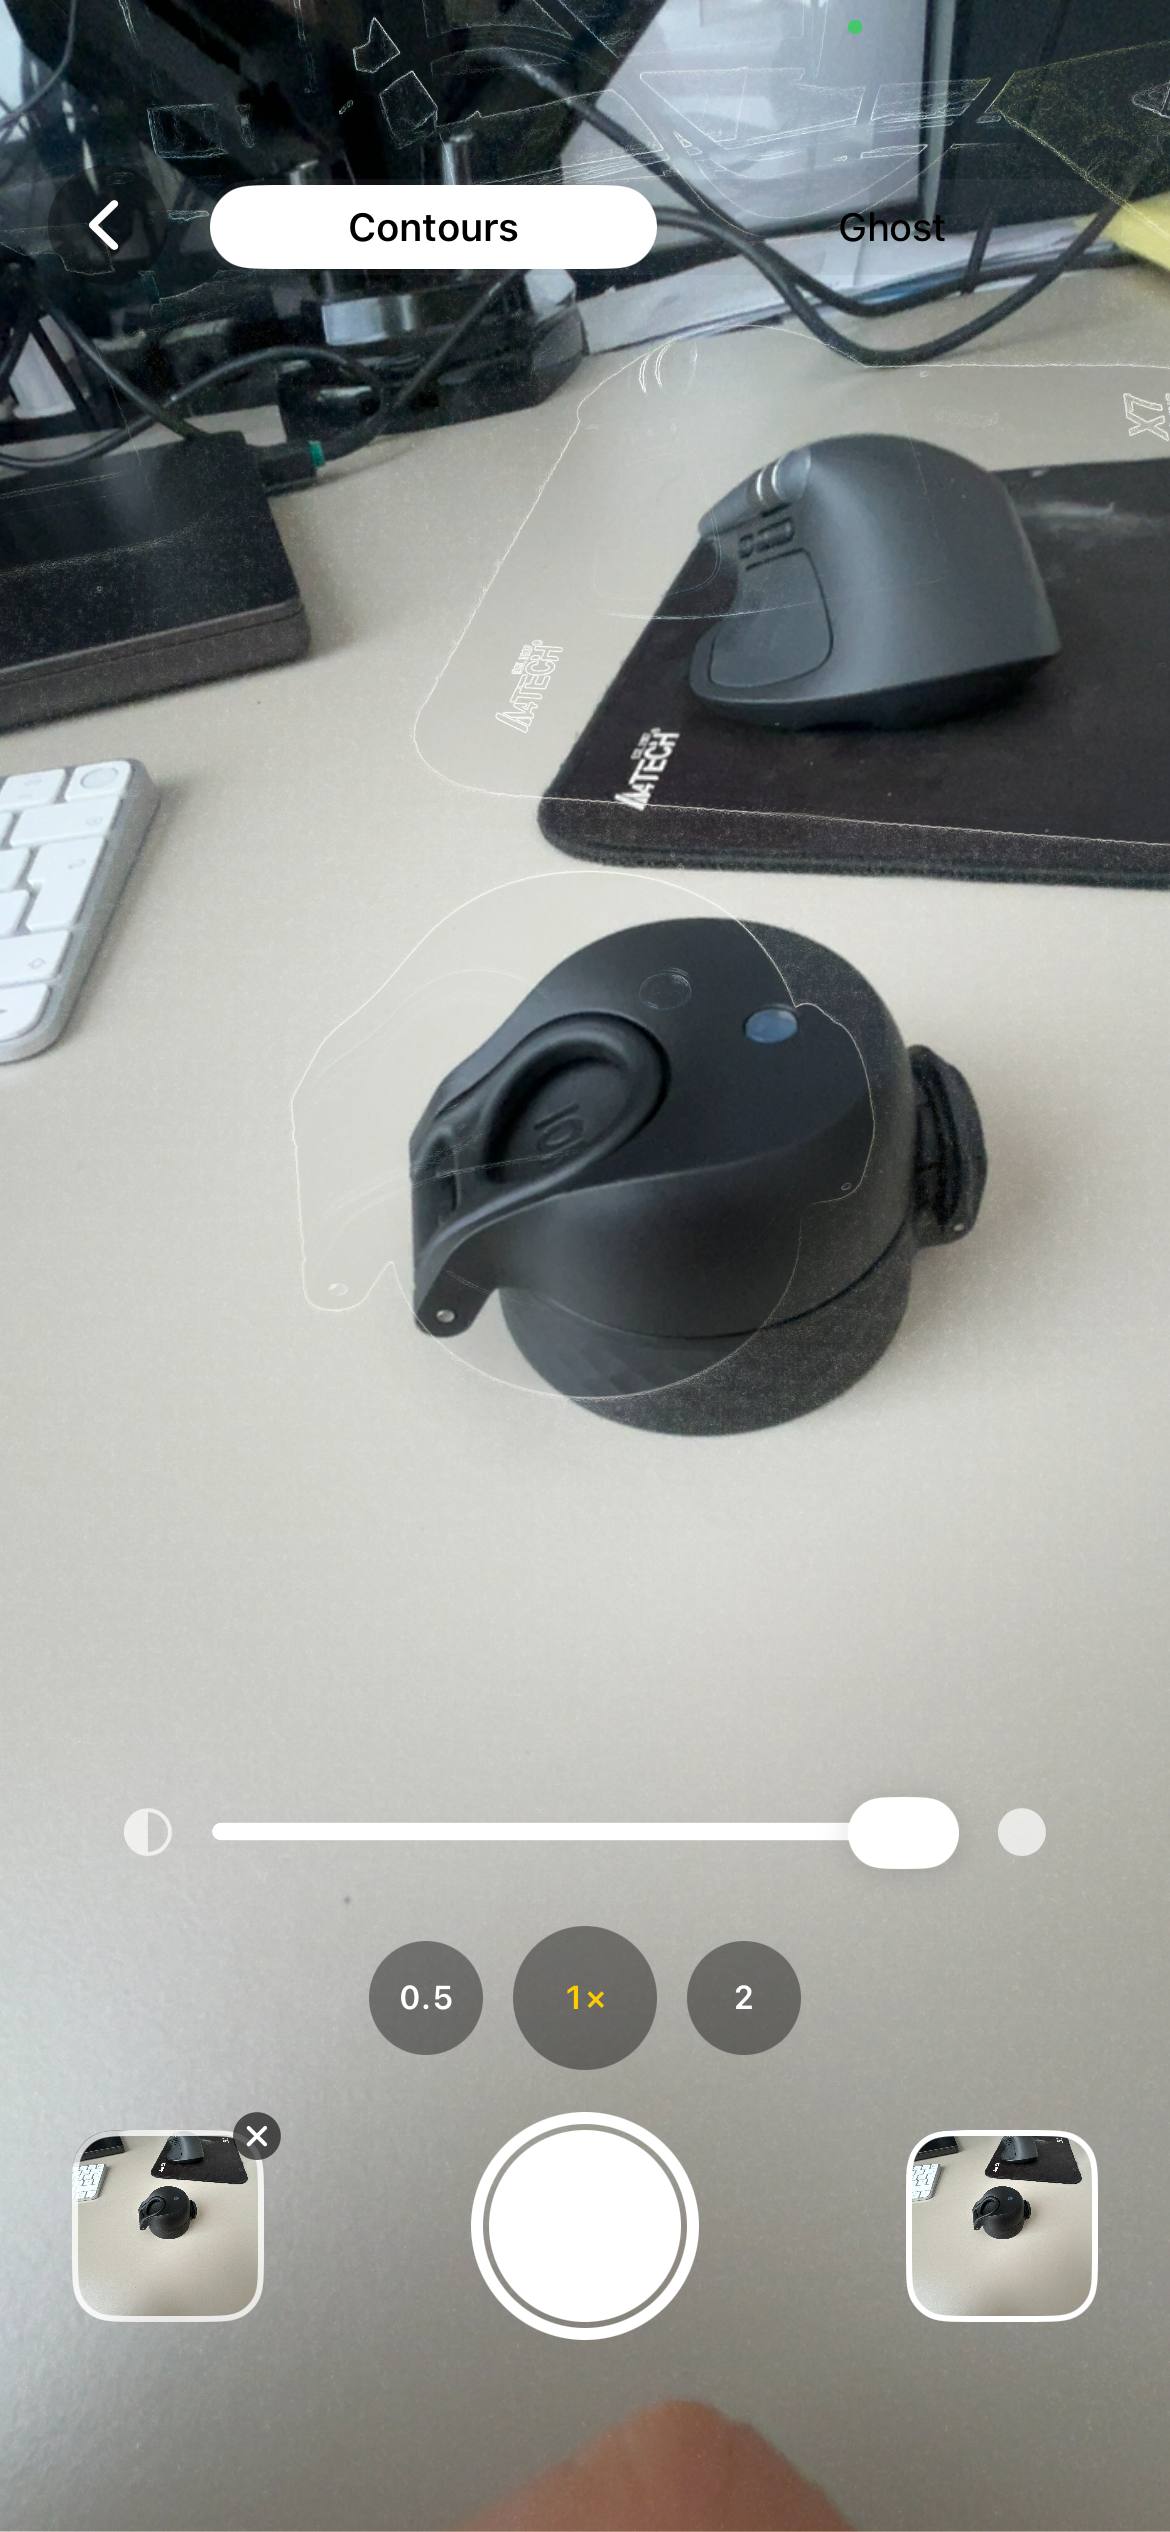
This is what I built Contour app for. You load your last progress photo, the app traces the edges of your body, and projects those outlines on top of your live camera. You move forward, back, left or right until the outlines snap onto you. Then you take the shot. The new photo lines up with the old one exactly — same distance, same angle, same crop.
Once you have two aligned photos, you can slide between them in Contour to compare, or stitch a whole series into a looping GIF and watch the change over weeks or months.
If you're tracking long-term changes, see my post on making timelapses: making timelapses.
How often should you take progress photos?
Once a week is the sweet spot. More often than that and the day-to-day water weight noise drowns the signal. Less often and you stop being consistent. Same day, same time, same setup, same outfit, every week. Sunday morning is a popular pick because the week's training is done and there's no urgency.
For a 30, 60 or 90-day challenge: take a day 1 photo, then weekly through the challenge, then a final shot the morning after it ends. Five to thirteen photos is plenty to see the change.
Common mistakes
- Taking the photo at random times. Bloated post-meal photos vs lean morning photos will swing your perceived progress wildly. Pick one moment in the day and own it.
- Comparing day 1 to day 7. A week isn't enough. The early changes happen on the inside — strength, work capacity, mood. The photo changes show up at week 4 and week 8.
- Only taking front shots. Your posture and your back change first. If you skip side and back angles, you'll miss half the progress.
- Flexing one week, relaxed the next. Pick one and don't switch.
- Storing photos as random gallery shots. Create an album — see skincare progress photos for an example of consistent albums and ordering. Name it. You want to scroll month one through month six in order, not hunt through three thousand photos to find them.
FAQ
What's the best app for progress photos?
For lining up framing, Contour overlays the previous photo on the live camera so you can match the shot before you take it. Free, iPhone, nothing uploaded. Download on the App Store →
Should I take progress photos every day?
Once a week is enough and easier to keep up; daily photos are noisy and small changes get lost.
What time of day is best for progress photos?
First thing in the morning, after the bathroom and before eating or drinking, is the most consistent state across weeks.
Front, side, or back — which matters most?
All three: front for torso shape, side for waist and posture, back for changes you can't see in the mirror.
Should I flex in my progress photos?
Take a relaxed comparison shot; a separate flexed shot is fine for vanity checks. Compare relaxed frames for true progress.
How do I take gym progress pics for muscle size?
Use the same lighting and a relaxed pose; take both relaxed and flexed shots but compare relaxed frames for true size change.
How to take 75 Hard progress photos?
Take weekly front, side and back photos at the same time each week and save each week's three photos in a dedicated album labelled Week 1, Week 2, etc.
How should I store weight loss progress photos so I can compare them?
Create a single album, name files Week-01-Front.jpg etc., keep chronological order and back up to cloud storage if you want an external copy.
See more guides on the blog: see more guides.
Line up the exact same photo, every time
If you want an exact framing match when you shoot, Contour overlays your last photo on the live camera so you can position yourself until the outlines line up. Use it with the protocol above to get consistent weekly photos. Free, iPhone, nothing uploaded.
Download Contour