Last updated: 12 June 2026
Pregnancy bump photos week by week
The pregnancy bump photo idea is simple: a weekly routine where you take a shot every week from the same angle. At the end you have a thirty-photo series that shows nine months of growth in thirty seconds. See also: how to take progress photos.
The problem is that by week 20, half the photos look oddly different and you can't tell what's the bump growing and what's just you standing closer to the wall this week. Here's the setup that fixes it, in under a minute a week.
When to start
Most people start the weekly photo at the start of the second trimester, around week 12 to 14, when there's something visible to track. You can start earlier if you want a true "before" — week 6 or 8, the flat baseline — but week-to-week change is invisible until later.
Many end at week 38 or 40; others include one "just-after" photo with the baby. Either way: pick the same day of the week and stick to it. Sunday morning is a popular choice — the week's just started, you're at home, the light's reliable.
The setup, once
Spend ten minutes setting this up at week 12. Then every weekly photo takes 60 seconds.
- Pick a wall. Plain. Off-white, light grey, soft pastel — anything that contrasts gently with skin and clothing. Avoid busy wallpaper, mirrors, doorways. A nursery wall works well.
- Mark a floor spot. A small piece of tape on the floor, half-hidden under a rug, or a discreet sticker. You stand on it.
- Mark the camera position. Tripod, stool, shelf, stack of books — whatever puts the phone at belly-button height and the right distance from the wall. Mark its position too.
- Pick the outfit. Same outfit every week. The classic is plain black sports bra and leggings (or a fitted vest) so the silhouette of the bump is unambiguous. Others prefer a stretch dress in a solid colour. Whatever you choose, it has to fit for the whole pregnancy — leggings with a high waistband stretch better than fixed-waist trousers.
- Pick the time. Same time of day, same hydration state. Morning, before breakfast, is most consistent. Bumps look bigger by evening for the same gestational age.
Practical measurements
Practical measurements: phone 1.2–1.4 m from the wall (about arm's length plus). Camera lens at belly-button height — measure from the floor to your belly button and mark that height on the tripod. Use landscape orientation and a consistent aspect ratio (3:2 or 16:9). If your iPhone has multiple lenses, set the phone to 3x optical zoom to keep framing steady. Tripod-less: use a stack of books set to the same marked height each week.
The weekly photo
Once a week, on the same day, same time:
- Stand on the floor mark, side-on to the camera.
- Relaxed posture — no sucking in, no pushing out. Bump where it naturally sits.
- Arms either both at sides, or both on the lower back. Pick one and don't switch — arm position changes the silhouette.
- Look forward, not at the camera. Same head position each week.
- Press the shutter (timer or remote — partner is fine but they'll drift the angle).
Lighting tips
Use a north-facing window or soft indirect light; avoid mixed light (window + warm ceiling light). If possible use the same curtains or blinds setting each week. If light differs, place a neutral-coloured sheet behind you to reduce colour shifts.
That's it. Repeat for thirty-ish weeks.
The framing problem
Even with the floor mark and the tripod, by week 22 you'll notice the photos are drifting. The phone's a centimetre lower this week than last. You're standing two centimetres closer to the wall. Tiny things — but over 25 photos they pile up into a series where the framing wobbles and the bump growth is hard to read.
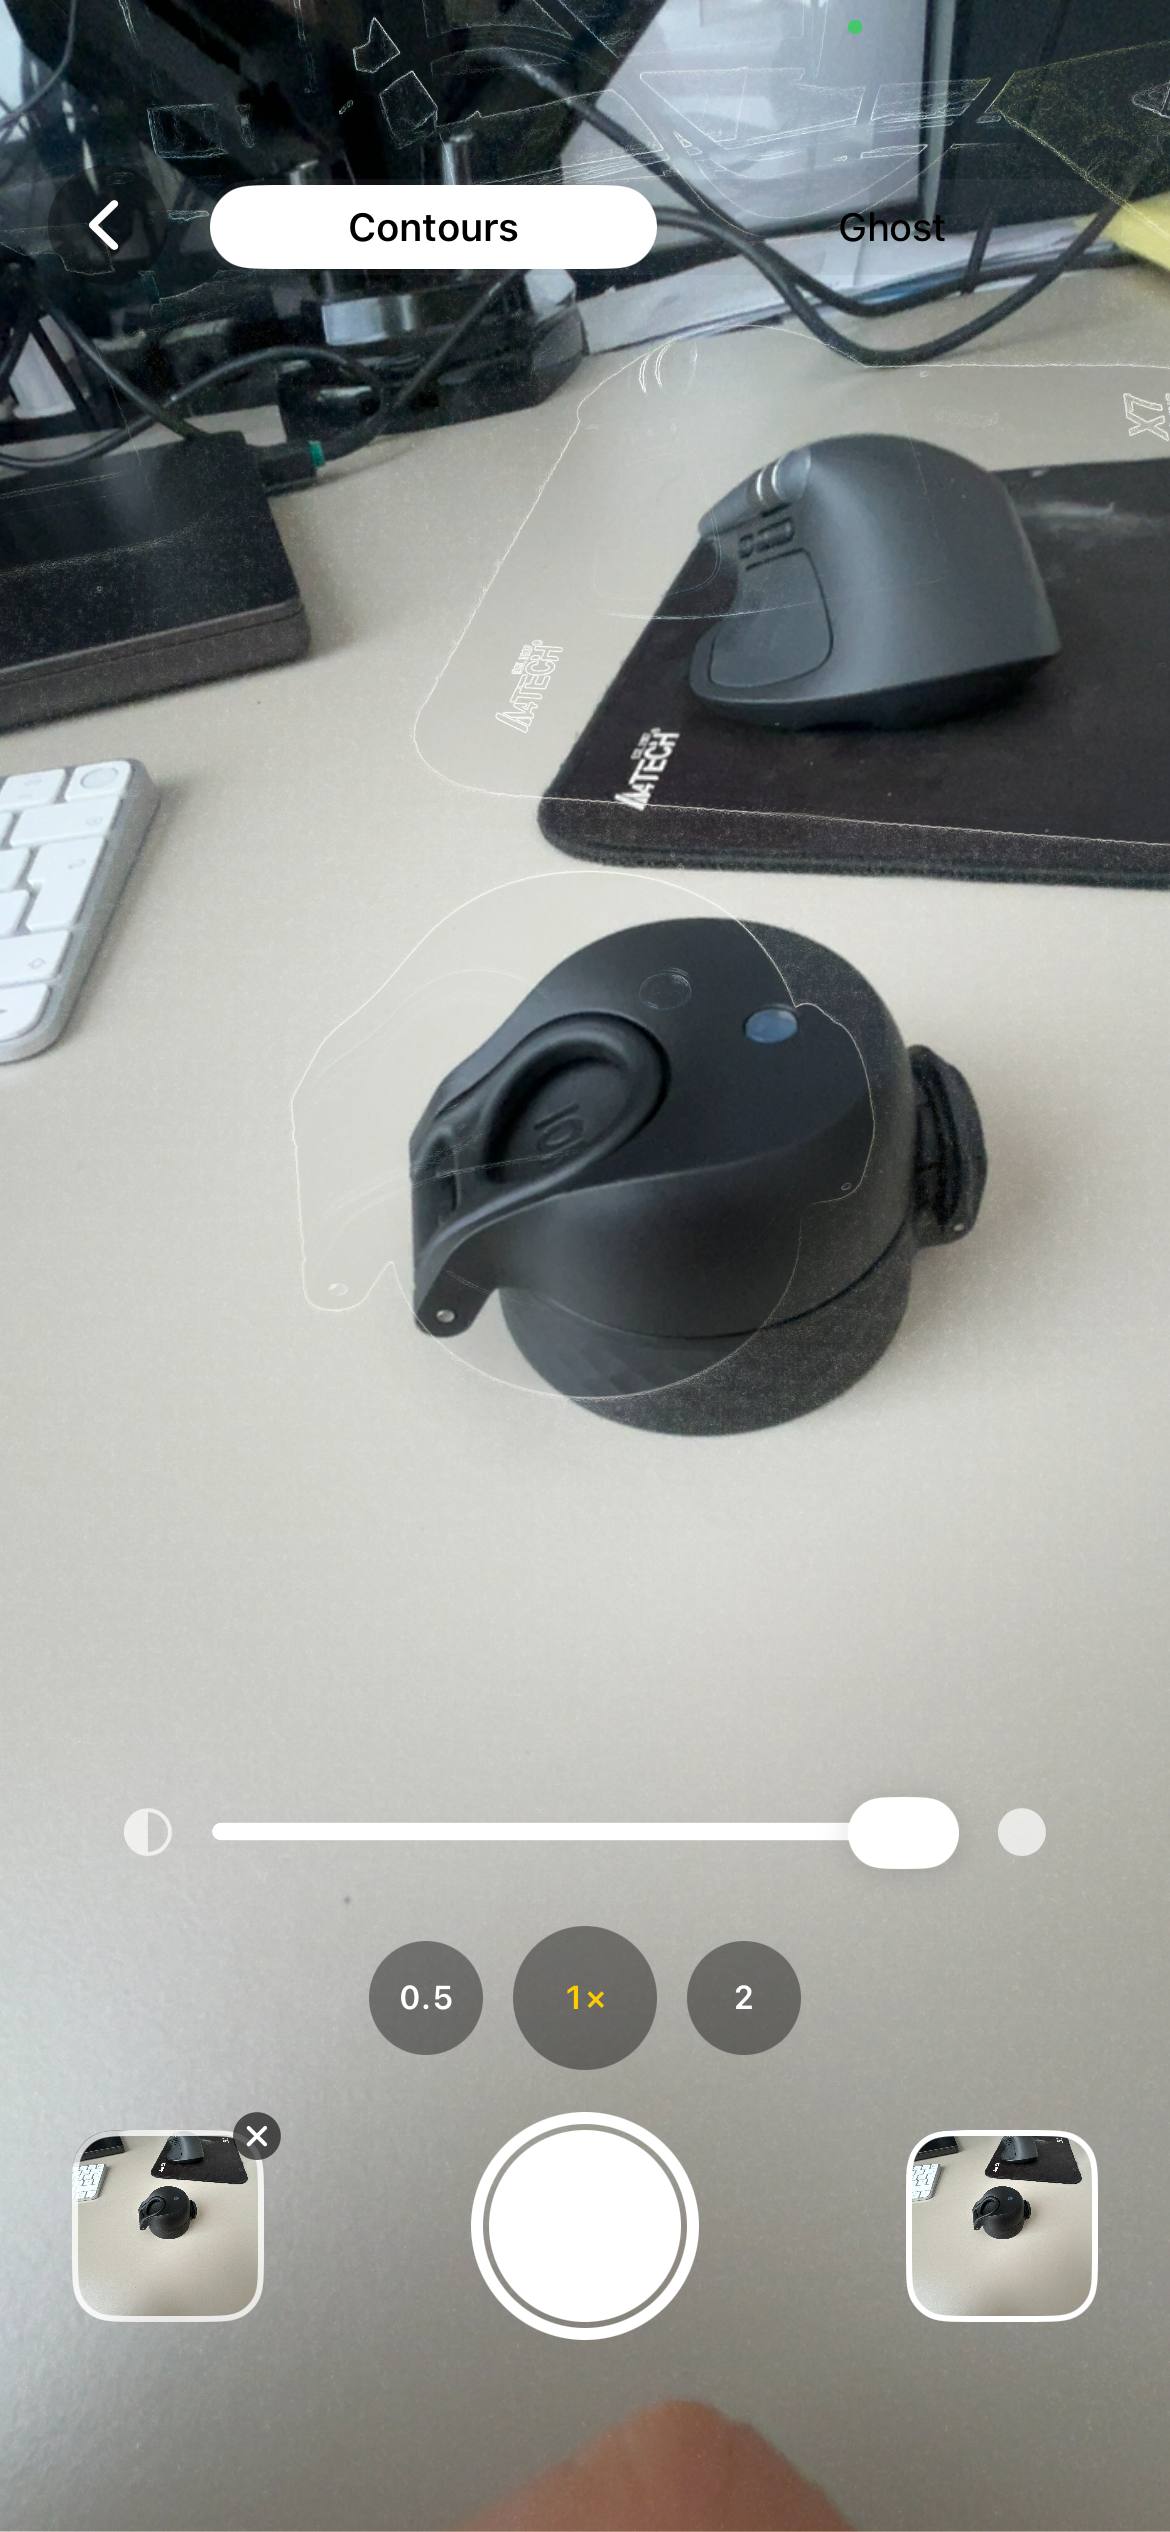
The fix is to see last week's photo while you take this week's. I learned this the hard way: my own series drifted after week 18 until I started aligning outlines before I shot. The same idea is used to recreate a photo. I built Contour for this: load last week's bump photo; the app traces the silhouette, wall edges and bump line and overlays them on the live camera so you can match the framing.
End result: 30 photos with identical framing. The only thing that changes between them is the bump.
Two angles, not just one
The classic week-by-week is the side profile. Add a front-on shot too if you want a complete record — it shows breast and torso changes the side angle hides. Same setup, same outfit, same week, just two angles instead of one. Twice the photo, ten more seconds per week.
What to do with the photos at the end
- Slide between any two. Drag a slider over weeks 12 and 38 — see the whole pregnancy in one motion.
- Make a GIF. Stitch all 30 photos in order and loop it. Contour does this in a couple of taps.
- Print a grid. Five columns, six rows. Frame it. The whole pregnancy on a single piece of card.
- Time-lapse video. Same idea as the GIF but as an MP4 with music underneath.
If you'd like technical notes on making a smooth video time-lapse see the construction timelapse on iPhone and the plant growth timelapse guides.
Mistakes people regret later
- Switching outfits halfway through. The bump growth is the story. A new outfit at week 24 splits the series in two.
- Mirror selfies. The phone gets in the way. The angle never stays the same. The reflection adds glare.
- Inconsistent angles. Sometimes belly-button height, sometimes chest height. The aspect of the bump changes completely with camera height — pick one and never change it.
- Starting late. Week 28 is when most people remember to start. By then half the story's already gone. If you're reading this and you're pregnant, take this week's photo today.
- Storing in your camera roll. 30 weekly photos are scattered across 5,000 random shots by the end. Create a "bump" album from day one and tag every photo.
FAQ
What week should I start taking bump photos?
Start around week 12–14 for visible change; start earlier (week 6–8) if you want a flat "before" photo.
What's the best app for pregnancy bump photos?
Contour overlays last week's photo on the live camera to help keep framing consistent; it's available for iPhone on the App Store.
Side profile or front-on bump photo?
Side profile shows the bump shape best; front-on is a useful second angle.
How do I make a pregnancy time-lapse?
Take weekly photos from the same position and stitch them in order; Contour can export a time-lapse from aligned shots.
How often should I take bump photos?
Once a week, same day and time; more often adds noise and little visible change.
What outfit is best for bump photos?
Choose plain, fitted clothing in a solid colour that contrasts with your wall; wear the same outfit for the whole pregnancy.
Can I do pregnancy belly photos by week with one outfit?
Yes — pick one fitted outfit that will still fit comfortably later in pregnancy; leggings and a fitted top are easiest for a consistent silhouette.
How do I organise bump pics by week on my phone?
Create a dedicated album named "Bump" on day one and move each week's shot there; add week numbers to filenames or use captions so they export in order.
Should I take monthly pregnancy belly pictures instead of weekly?
Monthly saves effort but misses gradual changes; weekly gives smoother time-lapses and is worth it if you commit to a one-minute routine.
One photo a week, framed the same every time
I built Contour to fix framing drift in week-by-week series. Load last week's photo, align its outlines with the live camera, and the framing stays identical across the whole pregnancy. Free on iPhone — nothing uploaded from your device.
Download Contour